The Find command in Linux or other Unix-like Operating Systems is probably my most favorite command to use in a CLI.
Before I share some handy use cases, I’ll assume that the reader of this article has never used this command so I’ll start with the basics.
The syntax
The most basic syntax is as follows:
find <path> <expression>
The expression can be a directory name or a filename. Note that the find command is recursive by default and will list every match in the present working directory and every match in its subdirectories up until the very last node.
This, however, isn’t the best way to use find. This will give you way too many results and make it pretty hard to find whatever you want. Lucky for us, the command is much more powerful than this.
For example, we can specify a type. (d for directory and f for file).
Specifying types
Let’s say we want to find a file named myhiddenfile.txt somewhere in the entire directory structure of the system starting from root. We can run the following command to get the file in seconds:
find / -type f -name "myhiddenfile.txt" 2>/dev/null

If you’re wondering the point of 2>/dev/null, it is to redirect the standard error output to /dev/null (which is basically nothing, nada, oblivion, null). If you don’t do this when searching for a file in / (root) without sudo, you’ll end up with a whole bunch of ugly permission denied outputs.
Regex
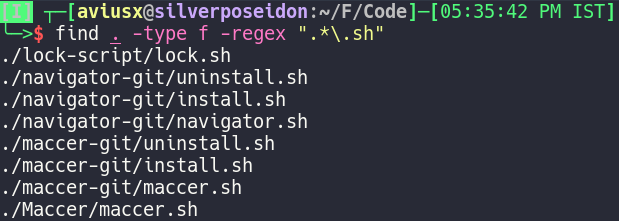
You can even use regex with find by swapping the name flag with regex. Let’s say we want to find every file in the present directory (and its subdirectories) that end with the extension .sh. We can do this:
find . -type f -regex ".*\.sh"
Maxdepth
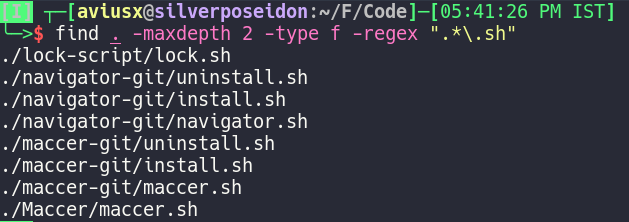
If we only want files in the present directory and we don’t want our search to be recursive, we can specify a maxdepth as follows:
find . -maxdepth 1 -type f -regex ".*\.sh"

And we get nothing because there is no such file in the present directory. If we changed our maxdepth to 2, we would get the same results again:
Exec
Now, let’s get to my favorite part. Exec!
Exec lets you execute a command on every file that has been found through your query. You can do that! Let’s say you want to find every uninstall.sh file in the present directory and cat it to see what it contains. You can run the following command to do so:
find . -type f -name "uninstall.sh" -exec cat {} \;
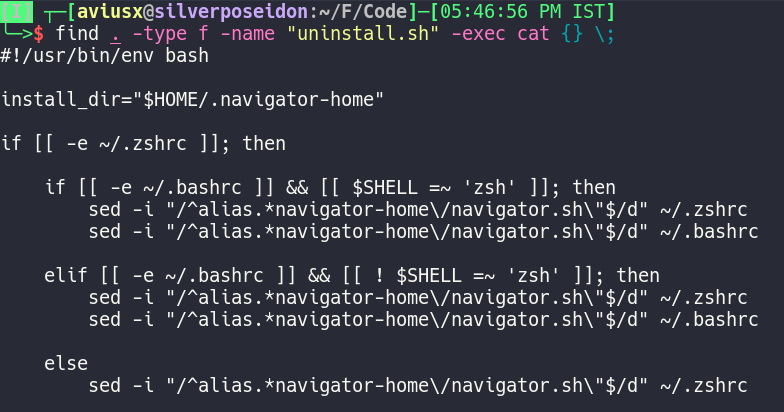
I’ve cut the output short because it’s a pretty long output but you get the point. I believe it deserves a little more explanation.
The {} is a placeholder for every file that has been found. So if a file named “myfile.sh” has been found, the command would resolve to:
... -exec cat myfile.sh \;
The \; is an escaped semicolon that signifies the end of your exec command. If you wanted to use any more flags after that, you wouldn’t be able to because find wouldn’t know where your exec command ended. This is why the semicolon is important.
Warning: I highly recommend running your find command without the exec option before executing any potentionally dangerous command! Read below to find out what I mean.
Let’s say you want to delete a bunch of .sh files in your present directory (but not the subdirectories) and you run the following command:
find . -type f -regex ".*\.sh" -exec rm {} \;
Now, you forgot to specify the maxdepth. This will cause you to lose files recursively in every subdirectory even though you didn’t want that! This is why I recommend running your command without the exec first to see the results before executing any potentially dangerous exec command.
CTF Tricks
So you know the basics of the find command. Let’s see a couple tricks you can use for CTFs! A lot of times you are given source code for something and are told to exploit the program to get the flag. But maybe you don’t have to!
You can try running the following command to see if any files in the source code folder contain the flag:
find . -type f -exec cat {} \; | strings | grep -P "CTF{.*}"

You can use the o flag with grep to only output the matches:

The strings is optional but I prefer it because sometimes the binary files end up containing the flag. You don’t want to miss it and it does no harm so I prefer to just use it. Also, don’t be a script kiddie and change the grep command to match your flag format ;-)
For Privesc
Here are some useful find commands to find writeable config files, files with sticky bits, SUID, GUID and intereseting writeable files in common places that might be used for privesc:
find /etc/ -readable -type f 2>/dev/null

find /etc/ -readable -type f -maxdepth 1 2>/dev/null

find / -perm -1000 -type d 2>/dev/null   # Sticky bit - Only the owner of the directory or the owner of a file can delete or rename here.

find / -perm -g=s -type f 2>/dev/null    # SGID (chmod 2000) - run as the group, not the user who started it.

find / -perm -u=s -type f 2>/dev/null    # SUID (chmod 4000) - run as the owner, not the user who started it.

find / -writable -type d 2>/dev/null      # world-writeable folders

find / -perm -222 -type d 2>/dev/null     # world-writeable folders

find / -perm -o w -type d 2>/dev/null     # world-writeable folders

find / -perm -o x -type d 2>/dev/null     # world-executable folders

find / \( -perm -o w -perm -o x \) -type d 2>/dev/null   # world-writeable & executable folders
Source: blog.g0tmi1k.com
Conclusion
Find is like a magic command. Everything described in this article is just what I use most commonly and probably doesn’t even begin to describe the command’s full potential. Feel free to read up more on the find man page to learn more about this insanely powerful command and have fun!
This article is written by Hrijul Bhatnagar and Peer Reviewed by Saket Upadhyay. To check profile of every writer of FrigidSec-Blog please visit HERE